Review: Revlon Frizz Control Hair Dryer

As a lazy, low-maintenance girl I am guilty of the terrible hair styling sin of going to bed with wet hair pretty much every night. I generally find that this method allows my hair to be clean and dry in the morning and I get to style (or not style) it and be ready for the day in a significantly shorter amount of time with a substantially smaller level of effort.

In spite of my preference for the path of least resistance, I do like to be prepared for any occasion, and as such I had bought this Revlon blow dryer a WHILE ago. It wasn’t until about a week ago that I finally needed to use it and took off all the tags and tape and opened it up.

revlon hair dryer

Revlon Frizz Control Hair Dryer


My first impression of what I found inside was an OCD rush of approval as I found that each component of the hair dryer was packaged in its own little plastic bag – the main hair dryer piece, the clip-on piece, the plug, and the manual were all neatly packaged in separate little plastic bags and taped up.

After I successfully unpackaged all the pieces from their plastic baggies, I proceeded to put the clip-on piece on the main hair-dryer piece, just like it was shown on the picture. This task ended up being a lot more difficult than I expected. There were no lock grooves, and twisting it couldn’t consistently be done smoothly and ended up making the clip-on piece come on lop-sided.

Fortunately, after a minute of experimenting, I was able to twist the clip-on evenly after snapping it on first, which terrified me because it felt a little too resistant and I didn’t want to break it.

With that part done, I plugged the dryer in, set it to low, pushed the red button the plug piece to get it going after initially being confused why it wasn’t doing anything, flipped my hair over, and began my seldom practiced hair drying ritual.

I found that the dryer wasn’t drying my hair fast enough, so I turned it up to medium, and eventually high. I may just be out of tune as to how long blow drying hair should take, especially hair as long as mine, but after about 5 minutes I was too tired of holding my neck in a upside down position with no significant hair drying happening, so I gave up with 2/3 wet hair.

I suspect if I was more patient with the dryer and used it properly, I would have gotten better results. I’m still not sure why it smelled weird when I used it though – possibly because it was so new? I’ll definitely try drying my hair with it again sometime just to see what results I get next time, but so far my lazy, low-maintenance rating for this dryer is not very positive. It is a gorgeous and very affordable hair dryer though!

Survival Strategy #21: Self-Perception

Self-perception is a tricky concept. It can either help us immensely when we’re working towards our goals or hurt our efforts. If we perceive ourselves with an accurate view of how we truly are, we will know what to work on to improve ourselves and what actions to take to get to where we want to be. But if our perception of our skills and personal abilities is skewed, we might end up working in a completely unhelpful direction because we aren’t aware enough of what our needs are.

The difficult part is in finding that balance in seeing ourselves how we truly are, without any undue pity or prideful extremes in our self-view. I find it easier to look for that balance when I’m trying to see myself through the perspective and abstractness of another person’s point of view.

As a very simple example, if I trip over the doorstep on my way into the room, to the people inside the room this is a very unexpected and potentially humorous event because adults don’t typically trip on doorsteps. Depending on the witnessing individuals’ personalities and social grace, they may either voice concern or laugh at the event.

No matter what their input, I will still immediately feel shame and embarrassment and continue feeling it whenever I think of that event, possibly for a long time afterwards too. But from the other people’s perspective,  they will express some form of feedback for a few minutes and go back to whatever they were doing, very soon forgetting the event – which is exactly what I would do if I watched someone else trip over the doorstep. Think of yourself the way you think of other people – you are just a human too, with all that potential, awesomeness, and humility.

tripping

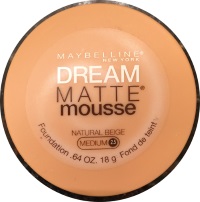
Maybelline Foundation Review: Dream Matte Mousse

Following my previous failed foundation experience, I was very keen to get back into searching and experimenting. The next time I went to Target I picked up this foundation by Maybelline for $7.49. I was drawn in by its enticing “matte” phrasing on the cover, which I felt would get me more coverage than the dewey coverup I tried last time. The packaging was also sealed in this one, which I was very pleased about. Unfortunately though, because of that I couldn’t experiment with the color, but I figured a medium beige would be a safe start for me.

front 200x200

When I got home and got to opening the packaging, I was very happy that no tools were needed to cut the plastic wrapping off. It ripped off very quickly and cleanly and I was good to go!

opened

I never used a mousse foundation before and I loved how dry yet smooth it went onto my skin. It was very easy to blend and covered my red and acne spots with medium to full coverage. The only issue was that this shade was too dark for me.

But! I found a workaround. I used the Covergirl foundation from my previous post as an overlay after I finished blending this foundation. I loved the results! I was able to get the lighter sheen from the Covergirl dewey coverup, while still having my problem areas covered with the matte mousse foundation. I also liked the contrast between the darker Maybelline foundation and the lighter Covergirl foundation – I felt like they balanced each other out.

I am happy to say that I believe I have found my new coverup routine – it’ll be a double effort from two different products, which old me would denounce as too much work, but I’m starting to see that in certain cases, it does pay off to give some extra effort!


Covergirl Review: clean Liquid Foundation

As a lazy person with not the clearest or most even facial skin, I struggle with finding flattering foundations that can help me present a better, cleaner version of my face. Recently, my local Target has not been keeping a steady supply of my most frequently used and approved e.l.f. foundation type, and I decided it’s time to experiment to find a new type.

My goal was to find a new affordable foundation in a store that I frequent for other purposes as well, not just makeup. For this reason, the next time I was at Safeway to replenish my food supplies, I also picked up this very promising Clean liquid foundation by Covergirl. I believe the price was $10.99, which was a bit more than the e.l.f. foundation I used to get, but still a very decent price by my standards.

IMG_2585 edited
Alluring New Safeway Based Foundation

The next day I opened up the packaging and was very excited to try out this new foundation. There were no significant challenges with the packaging, though I did need to hunt down some scissors. I was happy that the foundation was a completely sealed deal, since I am paranoid about contaminants being added to my already acne-prone skin.


Because of this acute fear of contamination, when I realized that this was a pourable type of bottle, my enthusiasm was slightly dampened. But I was still pretty excited to try out the product itself.

IMG_2587 edited
Pourable Liquid Foundation

Since my skin is neither excessively dry nor oily, I felt that the “Normal Skin” and the shade of classic ivory would be very appropriate for me. I was right on both accounts, however, I realized after I put the makeup that I didn’t get what I actually wanted, which was complete coverage. My skin didn’t look much different than how it did before any makeup was added to it. The red spots and blackheads on my face were just as visible, except now there was an oily gleam to my skin because of the makeup.

I believe this product would work very well for someone who is either an expert at layering makeup or who has very good skin already. But for me, this foundation will not be a staple replacement for my previous foundation. The search will continue!


Low-Maintenance Hairstyle – Step 3: Switching It Up

Although it can be very comforting to have the same hairstyle you can fall back on every morning and be guaranteed a decent result, sometimes it’s a good idea to experiment, not matter how much work this might seem like initially.

You never know when you might come across an even easier to maintain regimen. For example, for many years I sincerely believed that having a bob would be the least hassle option imaginable for a hairdo. Long hair wasn’t even considered an option actually, because of how much work I thought it would be.

Interestingly enough, it was due to my laziness that I inevitably skipped a haircut and had my hair grow out a little longer than a bob – and I loved it! Turns out, for my particular hair texture, long hair is WAY easier to maintain than a bob is. Because my hair is somewhat curly, when it’s shorter it just twists and pokes out at weird angles that I then need to flat iron/curl into place. Because I had short hair for most of my life, I never even knew that there was another way to go about hairstyling, and I assumed that the longer your hair, the longer you will need to work on styling it because you would just extend your current routine to match your extending hair length.

Fortunately, I was wrong and am very happy with my longer ‘do, which weighs my hair down and doesn’t require as much sculpting in the mornings as the bob did. I have been much more open to experimentation such it grew out, and look forward to whatever other things I might learn.

hair difference


Cozy, Lazy, and Easy Apartment Decorating – Lighting

Possibly one of the most important aspects of my apartment decorating adventures so far has been the discovery of how various lighting configurations affect the mood and feel of a room. Having north-west facing apartment windows means that natural light is very limited and there is a permanent gray, shadowed feel to the inside of the rooms.

Which is spectacularly gloomy.

The first few days of moving into the apartment, when I would come home from work I would feel very sad and I could not figure out why. After some careful observation of my living area and what was different between this new space and my old one, the lighting issue popped up.

I realized that there was almost no light in the apartment. The only light fixtures were in the kitchen, bathroom, and dining room area, with the rest of the apartment filled with useful outlets but no other technological lighting boosts. After some research and reflecting on what my previous encounters with cozy living spaces contained, I became aware that it helps to cozy up a room by providing at least three different light area sources in a room. I decided to experiment with this new idea!

I went out and got three Ikea Not lamps for $12.99 each. The price I was absolutely thrilled with, particularly when the other stores I looked in had comparable lamps for at least $80-$120 each. I placed this at three corners of the living room area at different heights (the segmented stems of the lamps are really easy to use). I now feel much more comfortable in my own apartment!

I also found this article helpful in identifying how lighting works.

Blonde Highlights Trouble – DIY Toner Experience

A couple years ago I decided I was tired of having all brown hair and that it was time for a change. In typical lazy, low-maintenance girl style, after a lot of experimentation with Target’s various hair coloring products I succeeded in getting my hair to hideous orange-brassy color. After regretting it fiercely, I finally conquered my low-maintenance self and went and got professionally done blonde highlights.

And I absolutely loved them!!

That is, until a few weeks later when they started turning brassy and the blonde did not look so blonde anymore. I was faced with a difficult choice – I wanted to keep the blonde in my hair but I also did not want to pay double digits to get it toned every few weeks. After some research, I found that apparently the way toners work is by using the color wheel and chemistry. The base of the toner is a color that is opposite of the color you want to get rid of in your hair. For example, if you want to get rid of reddish tints, you would use a green-based toner to cancel out the red since these two colors are opposite each other on the color wheel.

By this point I regained some of my adventurous spirit and I was very excited to give this a try so I started looking for a toner I could buy in the color I thought would work for me. Unfortunately, I was unable to find any toners in any of the stores I checked out, online or otherwise… So I resorted to more research for alternatives!

One of these I found was to use food coloring. Feeling like I had nothing to lose (food coloring was edible so it couldn’t be THAT bad for your hair, and in the worst case scenario the salon was only about 20 minutes and $20 away if I REALLY messed up), I decided to give it a try. Because I wanted to get the orange tints in my hair to go away, I got a violet gel food coloring and squeezed 1-2 drops to a the amount of shampoo I used for one hair wash and then applied that mixture to my hair. After making sure to leave it on all of my hair for a couple minutes, I rinsed it off (there was a lot of purple water in the shower for a few minutes, which was actually a lot of fun).

After about a week of this, I noticed that the brassiness in my hair was gone! Feeling thrilled that things were working in my favor, I kept washing my hair with the food coloring for about another week before I noticed that my hair was starting to look pink. Since that wasn’t a color I was going for, after that I started using the food coloring rinse just once a week and found a pretty decent balance in the color I wanted from my hair.

I didn’t notice any damage to my hair because of the food coloring rinses and it seemed to have a semi-permanent effect on my hair so if I didn’t “tone” it for a week or so, my hair would start turning brassy again. Overall, I thought this was a very easy, cheap, lazy, low-maintenance, and fun way to tone my now brown and blonde hair.

Food Coloring
Violet Gel Paste – $3.25

Target’s Apricot Blemish Scrub Review

As a long-time sufferer of acne and blackheads, I have tried experimenting with several different scrubs in my search for a fix.One of these was Target’s up & up Apricot Blemish Scrub.

First off, I chose this scrub over the others I saw at Target because of the price – $2.74, which was considerably cheaper than the other brands, and the ingredients looked pretty much the same when I compared the different products so I was very hopeful and excited to try out this awesome looking product.

My hopes were only minorly dashed when I applied it to my face and noticed that it did not smell very good – the apricot scent was very rough and strong. Honestly, I couldn’t wait to wash it off but even after that the smell lingered in my nose for a bit. But I was still excited to see the results of the treatment!

Unfortunately, within a week of applying the scrub religiously, I started breaking out even more than I did before I used it. My skin is naturally very sensitive and breaks out very quickly if it comes in contact with something it doesn’t like, so this wasn’t terribly unusual but still very disappointing.

Because of the smell and lack of promised results, I will not be using this product again, but the price is still very, very enticing.

apricot scrub
up & up Apricot Blemish Scrub – $2.74

The Importance of Throwing Away and NOT Using Old Foundation

As a lazy, low-maintenance girl I don’t often pay attention to how old my makeup products are. I just keep using them until I run out and then I get new ones. However, with some products that don’t get used up very quickly, I’ve learned that they can and do get bad with time!

I keep e.l.f.’s Mattifying Cream Foundation in my purse at all times as a just-in-case, backup foundation, since it’s easier to carry around and use on the go than the liquid foundation I normally use. As it happens, I didn’t need to use my cream foundation very often, and after a few months of carrying it around, I finally had an opportunity to use it again. To my horror, not only did it apply cakey and oily, it was very hard to wash it off later since it seemed to stick my skin extra well.

I got a new e.l.f. cream foundation and was amazed by how smoothly it came on, especially compared to my old foundation. I really love this product, but I will be paying attention to its expiration date next time.

e.l.f. Mattifying Cream Foundation - $6.00
e.l.f. Mattifying Cream Foundation – $6.00

Perfect Multi-Outfit, Inexpensive Flip-Flops!

During the awesomely warm and relaxed summer season, flip-flops are a great way to make any outfit look more breezy and casual. A challenge I run into when it comes to flip-flops is that they tend to look pretty cheap and single-toned, which makes it difficult to match to less casual outfits.

This reason is why I love, love, love these flip-flops. They look sophisticated enough to pass for a much higher price than they actually are, they are incredibly comfortable, and they are very durable for their cost. They also add some subtle standards to any outfit they are worn with, giving an actual shoe vibe rather than a flip-flop feel.

flip-flops
Cool Flip-Flops – $5.00